The 3D printer is working and I’ve begun calibrating it. There’s still a lot of tweaking to do, but now I can finally watch the whole process in action!
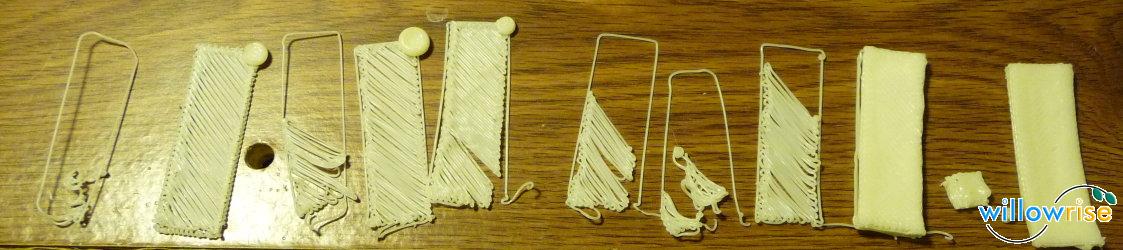
All of these are done with ABS. This is a chronological sequence. On the left, the extruder nozzle was too high above the bed and the ABS didn’t have any desire to stick to the bed. I actually printed half a dozen like this until I made up a sticky bed liner. More on that in a moment…
The second starts to take shape, but there is a big bead of plastic in the top right. It took me several tries to realize why that was happening. Can you guess? It’s kind of funny.
In the Arduino SNAP firmware source code, there’s a constant that defines a stepper motor enable pin for each of the axes. That pin is not mentioned in the wiki, so I figured it had been added since the creation of the wiki page. The enable pin is really useful for saving power. Without the motor enable pin, each axis pulls in 15-20W just to hold its place. That is especially wasteful on the Z axis, which moves very little during a build. I don’t like to waste power, so I connected the motor enable pins to my Arduino.
The firmware source code uses the same pin (15) for all three motor enable outputs. What I didn’t notice is that using the same pin for all three outputs simply can’t work! The RepRap host software prints the first layer, moves the Z axis, then disables the Z motor while it prints the next layer. In my wiring, disabling the Z motor actually disabled all of the stepper motors. D’oh!
I fixed that by disconnecting all the motor enable wires (I imagine there is a pull-up resistor on each board to make the wire optional), then I was finally able to print multiple layers. On the right side of the photo you can see slow progress toward matching the motor speed with the extruder speed. The bar is still very curved; I think the main reason for that is the makeshift sticky bed liner.
My makeshift sticky bed liner is a piece of paper lined with double-stick tape and upside down packing tape. It does stick to the ABS, but it melts and doesn’t stay flat, so the object ends up with a lot of curvature. The bed liner is the next thing to improve.
I do have a Sanguino, which will solve the pin count problem, but I won’t be able to use it effectively until I have a good breakout board for it. Thankfully, Zach is working on that. I could theoretically just solder all the wires, but running 20+ wires off a board with just solder holding them down is asking for trouble. The wires would break too easily.
Let me also talk about what I did with the heater. I said earlier that I would add a metal bar as a sort of strain relief to prevent breakage of the nichrome wire. Here is the heater just before curing the fire cement:
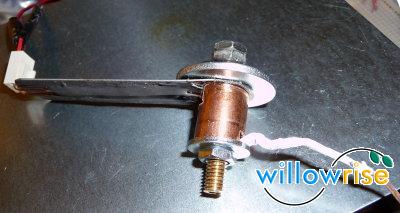
You can see the thin stainless steel bar extending from the brass heater barrel. The bar has a layer of JB Weld for insulation, then the bare copper leads, then another layer of JB Weld to secure the leads. At the end of the bar, the leads curve upward and form a socket, where I have plugged in an ordinary connector. The bar seems to have had the intended effect: even when I get clumsy and bump the heater, the leads are not affected anymore. I wish I had done this from the start–it might have saved me a month of agonizing over broken heaters!
You can see my thermocouple on the right side of the photo. It is covered with teflon tape because previous attempts to build the heater destroyed much of the insulation. I used a thermocouple because I have not found any thermistors designed to handle more than 200 C, and I’ve already determined that extruding ABS reliably requires about 220-240 C. Fortunately, teflon tape can handle 250 C. Here is the heater fully mounted:
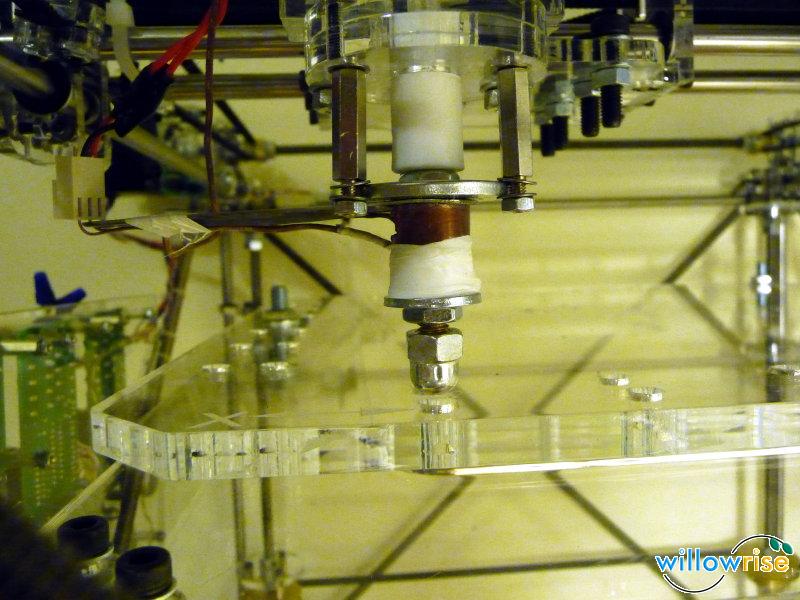
This heater reaches 220C, as measured by the thermocouple, in 5-10 minutes. It is limited to 170C if the cooling fan is turned on. The hottest part of this heater, halfway up the shaft, is about 30C hotter than what the thermocouple measures. If I allow it to get as hot as possible, the thermocouple can reach 240C, but the acrylic securing the heater begins to melt slightly at that point. It does not melt when the thermocouple measures 220C.
I learned that if the heater ever falls below about 185C while ABS is inside the barrel, the extruder will not move forward again even if I bring the temperature back up. I think this is because the small pool of melted plastic just above the barrel cools in a shape that hinders re-melting. When this happens, I can tell that the extruder is still putting enormous pressure on the filament because the drive screw, which usually carves threads into the filament, ends up grinding an almost smooth surface into the filament. To deal with this, all I have to do is re-heat the ABS, run the extruder backwards, and cut off the elongated piece that I pull out. At that point, pushing new filament into the extruder works fine, although the whole process takes 10 minutes or so.
Hasn’t anyone else experienced this? The software ought to provide an option to maintain the heater temperature even when not building. I may just put that in the firmware because the firmware is a lot simpler than the host software.
At the moment, I’m using the firmware and host software released in May 2008, with a few modifications:
- My X axis moves opposite the standard direction. To move to the home position, the stepper needs to step forward, not backward. I had to change the firmware to fix this.
- The temperature measurement calculations simply did not work on the host side. The firmware showed correct measurements while the host thought the heater was freezing at -17C! I dug in and found a hack in the Arduino firmware that makes the measured temperature look like a resistance value so the host software can convert the resistance value back into a temperature. This was apparently done to avoid changing the host software after the conversion from PIC microcontrollers to Arduino. I ripped out that logic from both the firmware and the host software; now the Arduino simply sends the temperature in C (and expects a temperature in C when controlling the heater). All is well. 🙂
As the machine builds, there are a lot of unnecessary pauses that cause the extruded filament to curl. I intend to try out the latest firmware and host software to see if those pauses have been eliminated. I printed out part of the minimug, but there were so many pauses that it was a curly mess.
Anyway, I’m really close now to a fully functioning RepRap!